


Current Page
LIVE1202
(International shipping available)


| Product Name | LIVE1202 |
|---|---|
| Brand | ALTO |
| Sale Price | Php 26,950.00 |
| Mileage | Points :269.50 |
| 수량 |   |
| Product Code | P0000HZO |
| Product Details | 12ch Analog Mixer |
| QR Code |    |
| Product promotion via SNS |
|
|---|

 |
|
Shipping Cost Payment Options: 1."To be Paid on Delivery" Shipping is still limited to some areas in Visayas and Mindanao via AP Cargo.Shipping Cost may be paid by cash to courier (door-to-door) or upon branch pick-up. Service may expand nationwide in the nearfuture; 2."Pre-pay" Shipping covers countrywide (Philippines). Shipping cost needs to be settled with the item cost prior to shipping of the package. Product Availability: Some products are provided on a per order basis and could take 3-5 weeks to be available upon order.Kindly inquire for the availability of the items. |
(Minimum Order : 1 or more / Maximum Order 0 or less)
Size Charts Select quantity.
To add product, select an option in the above option box.
| Name | Quantity | Price |
|---|---|---|
| LIVE1202 |


|
( 269.5) 269.5)
|
| Total(Quantity) : 0 (0 item) | ||


Deals
Product Details
Overview:
Professional Mixing Features
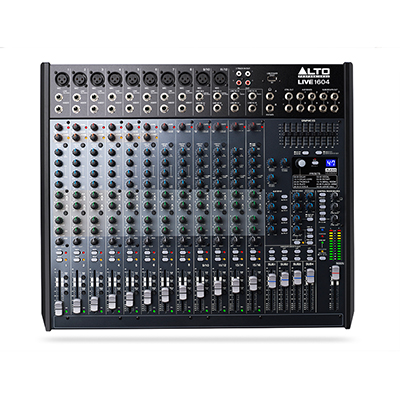
- The Alto Professional Live 1202 is a pro 12-channel, 2-bus mixer equipped with the tools you need to create the perfect mix. With flexible routing options and a multitude of onboard DSP tools, Live 1202 fits the demands of nearly any live performance environment. It features 7 balanced XLR inputs with switchable phantom power, 3-band EQs for additional tonal shaping, two aux sends per-channel for external effects and monitoring, and a 9-band graphic EQ for main or monitor outputs. A headphone jack with an independent level control enables additional monitoring and mixing. 60mm faders with LED meters provide precise control and visual feedback for accurate, hands-on mixing. With its diverse connectivity options, Live 1202 can handle any sized event from small coffee house gigs to mid-sized ensembles to full-stage rock bands.
Analog Compression & Superior Sound Quality
- Live 1202 offers high-fidelity sound and high-quality DSP tools in a single package. Each microphone channel is outfitted with a high-headroom ultra-low-noise DNA™ microphone preamp for unprecedented sound quality and a robust audio signal path. Live 1202’s high headroom results in cleaner mixes, a purer signal path, and loud, punchy audio. Onboard analog compression (channels 1-4) helps control dynamics and gel instruments together for a cohesive, defined mix. With high headroom, pristine sound, and built-in dynamic control, Live 1202 ensures that the full dynamic range of your mix comes across with striking clarity.
USB Audio Interface
- Record your mix directly to a Mac or PC with a single USB connection. Live 1202’s built-in USB port allows engineers, producers, and performers to convert two channels of 24-bit audio (Main Mix or Sub Mix 1/2) straight to a computer. Record live performances, band practices, theater performances, speaking events, and any other live sound event onto your computer for additional editing, mixing, and post-production. The USB connection is bi-directional, enabling sound files stored on your computer to be streamed to and played through Live 1202.
100 High-Quality Alesis DSP Effects
- Live 1202 comes ready to handle any mixing situation with premium 24-bit Alesis effects built right into its design. Select from 100 DSP effects that give you additional creative control in any mixing environment. Choose from room and space delays, small and large hall acoustics, plate and spring reverbs, flangers, choruses, and more. The effects presets make it easy to dial in your favorite sound or experiment with different effect settings on the fly.
Color-coded Interface
- Often, live sound environments are dimly lit and offer poor visibility to the mixing engineer. Live 1202 solves this problem by color coding each section of the mixer and providing brightly colored knobs so you can quickly and easily find what you need to adjust. Blue, green, red, yellow and white pots are instantly easy to identify in low lighting. LED indicators for output level, peak, and phantom power also assist in making sure that you have multiple visual cues that reflect everything you're hearing.
Features:
- 7 XLR inputs with high- DNA™ mic preamps
- Dynamic compression (Channels 1-4)
- 3-band EQ plus 2 aux sends per channel
- 60mm faders with mute switch and LED meters
- USB audio connectivity with level control
- 100 Alesis DSP effects
- Balanced XLR, balanced/unbalanced 1/4” outputs
- 9-band graphic EQ for main or monitor outputs
- Headphone out with independent level control
Applications:
- Small/Mid-sized PA systems
- Gymnasiums, fitness centers, and dance studios
- Houses of worship
- Theaters
- Bars, restaurants, clubs
- Band and Mobile DJ systems
- Special events, presentations, and weddings
Front Panel Features:
1. Mic Input: Connect a microphone or line-level device to these inputs with an XLR cable.
2. Line Input: Connect line-level devices to these inputs with 1/4" cables.
3. Insert: Use a standard 1/4" TRS cable to connect an external processor (such as a compressor, limiter, external EQ unit, etc.) to this jack. The signal will be taken after the channel's gain control and returned before the channel's EQ controls. The tip of the TRS connection is the send, and the ring is the return.
4. Gain: Adjusts the channel audio level (pre-fader and pre-EQ gain). Adjust this so that the Signal LED lights up.
5. Peak LED: The LED will flash if the signal is clipping. If this happens, decrease the setting of the Gain knob.
6. Low Cut Filter: When this button is depressed, that channel's audio will be sent through a 75 Hz low-frequency filter with a slope of 18 dB per octave. This is useful for reducing low-frequency noise when using microphones.
7. Compressor: Adjusts the amount of compression on the channel, applied by the mixer's built-in compressor. The LED next to the knob will light up when the compressor is on.
8. Hi EQ: Adjusts the high (treble) frequencies of the channel.
9. Mid EQ: Adjusts the mid-range frequencies of the channel.
10. Low EQ: Adjusts the low (bass) frequencies of the channel.
11. Monitor Knob: Adjusts the pre-fader level of the signal sent from that channel to the Monitor Mix, whose level is controlled by the Monitor Fader.
12. DFX Knob: Adjusts the post-fader level of the signal sent to the mixer's effects processor, whose level is controlled by the DFX Return Fader (DFX Rtn).
13. Channel Pan / Balance: If this knob is labeled Pan, it adjusts the (mono) channel's position in the stereo field. If the knob is labeled Bal, it adjusts the balance between the left and right channels of that stereo signal.
14. Channel Mute: Press this button to mute/unmute the channel. The LED next to the button will light up when the channel is muted.
15. Channel Fader: Adjusts the audio level on the channel.
16. Signal LED (Sig): Indicates that the channel's incoming audio signal is within an optimal range.
17. Aux Send: Use 1/4" TRS cables to connect these outputs to the inputs of an external amplifier or active monitor. Use the Monitor Knob (Mon) on each channel to control the level of the signal sent to Aux Send 1. This is useful for creating a custom monitor mix for onstage musicians.
18. Aux Return (Aux Rtn): Connect the outputs of an external device to these inputs with 1/4" mono cables. If your source is mono, plug it into the left jack and it will be heard on both the left and right sides.
19. Aux Return Fader (Aux Rtn): Controls the audio level sent into the Aux Return (Aux Rtn) inputs.
20. Graphic Equalizer: When the EQ On/Off switch is on (depressed), you can use these controls to adjust the equalization of the main mix.
21. EQ On/Off: Enables or disables the Graphic Equalizer.
22. Main Out / Monitor Out: When this button is raised, the Graphic Equalizer will affect the signal sent to the Main Mix Outputs. When this button is depressed, the Graphic Equalizer will affect the signal sent to the Aux 1 (Mon) Output Effect Selector: This knob determines what effect the mixer's internal effects processor will apply to the various channels. Turn the knob to change the effect number, and push the knob to select it. The display next to the DFX Mute button will show the preset number. Each channel can send different levels of audio to the processor by adjusting its DFX Knob.
24. DFX Mute: Press this button tomute/unmute the effects.
25. DFX Peak LED: The LED will flash ifthe signal is clipping. If this happens,decrease the setting of your sourcechannels' DFX Knobs. When the effects processor is muted, the LED will be solidly lit.
26. DFX Return Fader (DFX Rtn): Adjusts the volume of the audio sent from the mixer's effects processor.
27. DFX Bypass: You can connect a standard 1/4" latching-style footswitch (sold separately) to this input and use it to bypass the mixer's internal effects processor (when the footswitch is in its "closed" position)
28. Phones Output: Connect 1/4" stereo headphones to these outputs. The Phones Volume knob controls the volume. The Phones Source button sets what signal is sent to this output.
29. Phones Source: When this button is raised, the signal from the Main Mix Outputs will be heard in the Phones Output. When this button is depressed, the signal from the Control Room Outputs (Ctrl Out) will be heard in the Phones Output.
30. Phones Volume: Adjusts the volume of Phones Output.
31. USB In Source: When this button is raised, the signal sent to the mixer through its USB Port will be sent to the Main Mix Outputs. When this button is depressed, the signal sent to the mixer through its USB Port will be sent to the Control Room Outputs (Ctrl Out).
32. USB In Level: Adjusts the level of the signal sent to the mixer through its USB Port.
33. 2 Track In Source: When this button is raised, the signal from the 2 Track In will be sent to the Main Mix Outputs. When this button is depressed, the signal from the 2 Track In will be sent to the Control Room Outputs (Ctrl Out).
34. 2 Track In Level: Adjusts the level of the 2 Track In.
35. Monitor Fader: Adjusts the level of the Aux Send 1 (Mon) output (the Monitor Mix).
36. Main Fader: Adjusts the level of the Main Mix Outputs.
37. LED Meters: Shows the audio level of the Main Mix Outputs. The Clip LED can light up occasionally, but if it happens too often, reduce the volume of the mix and/or individual channels.
38. Phantom Power: Activates/deactivates phantom power. When activated, phantom power supplies +48V to the XLR mic inputs and the LED next to the button will light up. Please note that most dynamic microphones do not require phantom power, while most condenser microphones do. Consult your microphone's documentation to find out whether it needs phantom power.
39. Power LED: Illuminates when the mixer is on.
40. USB Power Connection: You can use this USB port to connect and power (or charge) a device that requires power from a 5V USB bus.
Rear Panel Features:
1. Power In: Use the included power cable to connect the mixer to a power outlet. While the power is switched off, connect the power cable into the mixer first, then connect the power cable to a power outlet.
2. Fuse Cover: If the fuse is broken, use a screwdriver or other tool to lift this tab, and replace the fuse with a fuse with the same rating (printed just above the Power In). Using a fuse with an incorrect rating can damage the unit and/or fuse.
3. Power Switch: Powers the mixer on and off. Turn on the mixer only after connecting all of your input devices but before turning on your amplifiers. Turn off amplifiers before you turn off the mixer.
4. Main Mix Outputs: Use standard XLR or 1/4" cables to connect either pair of these outputs to your loudspeakers or amplifier system. Use the Main Fader to control the level of these outputs.
5. Control Room Outputs (Ctrl Out): Use standard 1/4" cables to connect these outputs to your control room (booth) monitors or amplifier system.
6. USB Port: Use a standard USB cable to connect this USB port to a computer. The mixer can send or receive audio to or from your computer through this connection.
• When sending audio, the main mix will be sent from the mixer to your computer.
• When receiving audio, it will be sent from your computer to the Main Mix Outputs or Control Room Outputs (Ctrl Out), depending on the position of the mixer's USB In Source button.
7. 2-Track Inputs (2 Track In): Connect these inputs to the outputs of an external sound source using a standard stereo RCA cable (sold separately). Use the 2 Track In Source button to send this signal either to the Main Mix Outputs or to the Control Room Outputs (Ctrl Out).
8. 2-Track Outputs (2 Track Out): Connect these outputs to the inputs of an external recording device using a standard stereo RCA cable (sold separately).
Sample Application/Connection Diagram:
What's in the Box?
- Live 1202
- Power Cable
- User Guide
- Safety & Warranty Manual
Specifications:
Mono Input Channels
- Microphone inputs:........... Electronically balanced, discrete input configuration
- Frequency response: ........20 Hz to 20 kHz, +0.5 dB
- THD+N............................<0.02% at 0 dBu, 1 kHz
- Gain range...................... 0 dB to 50 dB (Mic)
- SNR: ...............................90 dB
Line Inputs Electronically balanced
- Frequency response:............... 20 Hz to 20 kHz, +0.5 dB
- THD+N: ................................<0.03% at 0 dBu, 1 kHz
- Sensitivity range:..................... -15 dBu to 30 dBu
Impedances
- Microphone inputs:................. 51.1 KΩ
- Channel insert return: ..............200 KΩ
- All other inputs:....................... >100 KΩ
- 2-Track outputs: .....................10 KΩ
- All other outputs: .....................20 KΩ
Equalization
- High-shelving:................. ±15 dB @ 12 kHz
- Mid-bell (mono):............... ±15 dB @ 2.5 kHz
- Low-shelving:................... ±15 dB @ 80 Hz
- Main EQ: ...........................9 EQ bands (63 Hz, 125 Hz, 250 Hz, 500 Hz, 1 kHz, 2 kHz, 4 kHz, 8 kHz, 16 kHz), ±15 dB
DSP Section (DFX)
- A/D & D/A converters: ................24-bit
- DSP Resolution:........................ 24-bit
- Effects: .....................................10 DSP effects families with 10 variations available per family
- Presets:..................................... 100 total
- Controls:..................................... Rotary encoder to select preset, DSP mute switch, peak LED indicator
Main Mix
- Noise (bus noise):.......... Fader 0 dB, channels muted: -64 dBr (ref: +4 dBu) || Fader 0 dB, all input channels assigned & set to unity gain: -64 dBr (ref: +4 dBu)
- Phantom Power:............. Mic Pin2/Pin3 and Pin1 47±2V
Power Supply
- Main voltage......................: USA/Canada: 100-120 VAC ~60 Hz || UK/Australia: 240 VAC ~50 Hz || Europe: 210-240 VAC ~50 Hz
- Power consumption:.......... 50 W
- Fuse:..................................... 1.25 A
- Main connection:................... Standard IEC receptacle
- Dimensions ..............................(w x d x h) 14.1” x 13.6” x 3.1” / 358 mm x 346 mm x 80 mm
- Weight ..............................9.0 lbs. / 4.1 kg
Related Items


Payment
1. Payment by bank transfer with bank account.(ex.BDO, Metro Bank, etc)
2. Payment via PayPal account : PayPal verified account is required.
3. Payment by credit or debit card via PayPal(Visa, Master, JCB, Amex etc.) : PayPal account is NOT required.
4. Payment by credit card(Visa, Master, JCB, Amex etc.) :3D verified credit cards only are eligible for payment by credit card.
5. Payment by bank transfer without bank account.(ex.LBC, Western Union, etc)
For payment by bank transfer without bank account, the customer may pay by internet banking or telephone banking. The customer may also make payment at local banks. The name of the depositor is required to match the name registered as the depositor when placing the order. Payment shall be made within 7 days from placing the order. The order will be automatically cancelled otherwise.
*Important: All Prices in the website are subject to change without prior notice
Shipping
Shipping method : LBC, 2GO, Fedex, DHL, EMS, Air21, AP Cargo, JRC, etc
Covered destinations : Nationwide
Shipping cost : may vary on destination and purchase amount
Shipping time estimate : 2~6 business days(in case of in-stock products). Order-based or imported items may take longer to ship. Please inquire by calling the store or via email whether the item is in-stock or order-based.
Shipment bound for EMS premium regions : The customer may be required to pay additional cost.*Important : Products are to be shipped after the payment is made. Please note that shipping may take longer depending on the products of the order.
International shipments may be subject to import taxes, duties and customs fees, which are levied once your package reaches the country of destination, and are the responsibility of the recipient. In case that the customer refuses to receive the parcel, the products are to be returned to Philippines and will not be shipped again. According costs(shipping, customs and etc) are the responsibility of the customer and will be deducted from the refund.
Returns & Exchanges
Please make sure you have selected right options(e.g. size, color and quantity) prior to completing the order.
Once the order is completed, it is assumed that the customer agreed on our exchange/refund policy.
Exchanges and refunds are accepted only if the exchange/refund request is proven valid for the following reasons.
Eligible for exchanges and refunds:
On condition that the package (Labels, tags) of the products are intact.
- Sold out products
- Wrong item delivered
- Defective products
- Shoddy Goods
Ineligible for returns and exchanges:
- Products with customer-induced damages
- Products whose value is decreased significantly due to elapsed time or other reasons and are not in condition for re-sale
- Change of mind
* (Please contact us or Email customer service for details)
Exchange/refund procedure
For exchanges/refund, the customer is required to post an exchange/refund request on the “Q&A” board.
The request is to include the reason for exchanges/refunds and the order number.
In case of exchange/refund request due to product defects or wrong item delivered, detailed photos of the products are also required. Exchanges/refunds will be made shortly upon careful examination and confirmation on the reported defects.
The shipping costs occurring from product defects or wrong item delivered are the responsibility of the channel.com.ph.
>Warranty
channel.com.ph will repair any product under warranty at no charge or replace the unit of the exact model if deemed necessary.
If repair of returned merchandise is necessary due to neglect, damage, misuse, or improper repair by others, a charge will be made for labor, parts, and return freight.
Product Inquiry

Reviews
Post your review here.
There are no posts to show


Q&A
Product related questions and answers
There are no posts to show